design

Thursday 27 October 2011

Poinsettia Wreath for Christmas

Some of you may remember the poinsettia flower that I did as a tutorial a few weeks ago. I pondered and pondered about what I could do with it and finally this wreath is what I came up with.

If you want to make one then you will need some red felt to make the wreath and some kapok to stuff it. I cut out a circle of felt. I used a large ribbon reel but feel free to improvise and use whatever you have in the house. The centre was marked with a reel of beading wire that I happened to have handy.

The wreath is sewn together using good old blanket stitch and stuffed with kapok just before it is completely sewn together. Sew the poinsettias to the wreath.

I uesd a 38mm satin ribbon in teal to make the bow and the hanging ribbon. You can buy it from Craft Fairy here.

Sunday 16 October 2011

Everlasting Corsage of Roses for a Winter Celebration

How many of you have paid for a beautiful fresh corsage only to have it collapse during the day?  This post, I hope will help you to avoid this and show you how to make your own corsage.


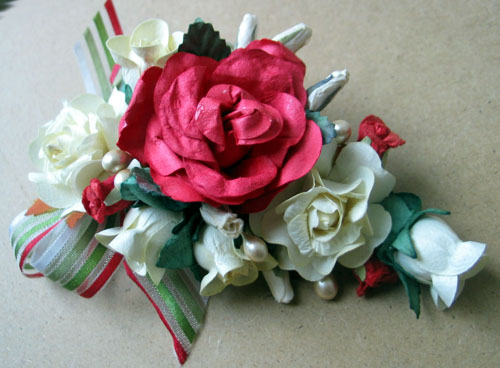
Here is the finished article and I guarantee that it will look this good next week and next month.
So, to get yourself started you will need:

1 really large rose
2 curly roses
barrel roses
small rose buds
medium rose buds
Ribbon


  If you look above you will see what I used. Now, apart from the larger roses, you can vary the others a little. However, you will need lots of sizes. You will not get the same effect if you use all of the same size flowers so be warned.

I layered the smaller roses as shown below.


Start with the barrel at the top and gradually work down.Twist the stems together as you go.

Put the large rose in the centre and then twist the wires together at the back of the corsage so that they lie flat. At this point, this is what you'll end up with.
Add any of the barrel roses that you will use and twist in to place. You will see that there are barrel roses on one side and small buds on the other. You need that to balance out the design.
Do not be tempted to add the really large rose too soon. Get everything into place first and then twist in the large rose.

 
 Now add the last of the small roses and twist. Add the last of the large curly roses. twist into place.

To make the bow, fold the ribbon in a figure of eight shape and then go over the figure for a second time. Wrap the wire of one of the pearls around the centre of the ribbon and use the remaining part to wrap around the corsage and secure it in place.

Now you have youe corsage that you can wear, but have you thought about making several corsages and using them as table decorations? They make your table look superb.

Sunday 9 October 2011

Ribbon Poinsettia Tutorial

Do you like it? I really hope that you do as I am getting a tutorial ready for you.

The ribbons are available on Craft Fairy and the beads are from my stash.
If you want to make one then all that you have to do is get the follwing ready to play with.

a needle
thread
scissors
measuring tape.
Start by cutting 5, 7cm pieces of scarlet ribbon and 5, 5cm pieces.

Fold a 7cm piece in half and pinch. Where the pinches are sew together as shown.


Below you will see the two stages together so I hope that this helps.
Now fold the petal on the right side and you will have a pointed petal. If you want really sharp points then you can iron it flat. Repeat with all five petals and lay out side by side on your work space.

Sew along the edge of all of the petals as seen.

Pull the thread tight and the petals will form a circle.


Now repeat the above with 5cm pieces of ribbon and you will get a smaller flower.

Place one flower on top of the other and sew together.


Sew some gold beads to the centre and sew two pieces of teal ribbon to the back for the completed flower.

Saturday 8 October 2011

How to make a punched flower

I hope that you liked the card shown in the last post and I can't believe that it has been so long since I published that.

So, if you want to make one you will need punches from Kuretake. You will see them in the photo below.
I also used two pigment pads for colouring and some adhesive.
Start by punching out lots of petals and two circles.


 Below you can see how I coloured the petals.
 Then I punched out a circle.

Next I stuck the petals to the circle, overlapping as I went. Continue until the whole of the cirle is full and then add another layer offsetting thm over the first ones.
Cover the top of the center circle with another circle and this will cover the mess that you may have made. Basically your flower is now made.
To make it look better you can add a ribbon leaf as I did below. Now attach to the card.

Friday 13 May 2011

Vintage twisted ribbon roses

I've noticed that these twisted roses are appearing on many cards and sewing projects lately so I thought that I would bring you all a project and a video on how to do them. I've used fairly bright, well, very bright ribbon to make them as they can be shabby chic, but they can also be vivid and fashionable.

What You’ll Need:

Ribbon – at least 16mm wide

The one that I used here is the 23mm wide swiss dot grosgrain.

16mm satin ribbon in willow

a needle and thread
Cut a length of ribbon, about 30 to 45cm long. The longer (and wider) your ribbon, the larger your rose will be.
Tie a knot at one end of the ribbon, this will be the center of the rose.

Knot the end of the thread and secure it to the base of the knot.

Start twisting your ribbon and stitch it into place around the knot.

Carry on twisting the ribbon and sew it onto the rose that is developing.
Below is what it should look like from the front at this stage.
Keep on twisting and sewing until you have the size of rose that you want.

Once all the ribbon is wound up and secured, tuck the ends underneath and sew them into place with a few small stitchesKnot your thread, trim it, and you’re done
Now for the leaves. They are really simple too.

Take a length of the green satin ribbon and sew along one edge as shown. The longer the length the bigger the leaf. As a rule of thumb, your ribbon should be about two and a half times the width of the finished rose.
Pull the thread gently until you have gathered the ribbon as shown below.Stitch the ribbon together along the middle and then stitch it to the back of your rose and there you have it. Now you can make a card or far better brighten up a jumper or a hat.

Wednesday 11 May 2011

Ribbon Flower Number 2

Well, the last post on ribbon flowers seems to have gone down really well, so, I've decided to post another type of ribbon flower for you all. Just in case you all think that I can't use anything other than pink, I've made this one in blue.

I did stoop to pink for the thread that I used to gather the ribbon. I did this for a purpose though as it is easier to see in the photographs.

Decide on the number of petals that you want. I used 5. The more petals, the bigger the hole that will be left in the middle to cover up with a button or a stamen of some sort. You'll see what I mean as we progress.If you decide on 5 petals than the length of ribbon used to make each petal should be 2 1/2 times the width of the ribbon. Yes maths!
Made simple
Ribbon = 16mm
Length required for each petal = 40mm
5 petals = 200mm or 20 cm.
Leave an extra cm or 2 for the folding over of the edges. You can always cut off any excess but you can't get it if it isn't there.
So you will need a piece of 16mm ribbon that is about 22 cm long.

Place the ribbon on the table in front of you. The side furthest from you is the inner edge and the one closes to you is the outer edge of the flower.
Mark the ribbon into sections on the inner edge. On a 16mm ribbon these ehould be every 40mm.
Using a running stitch sew along the ribbon as shown in the photograph. Remember to loop the thread over the outer edge of the ribbon when you get to the top of each section. Sew your 5 sections. End with the thread at the outer edge of the ribbon.

Start to pull the thread. You will see the ribbon curl up in front of you. Don't panic. Keep on pulling gently until the petals emerge. The reason for looping the thread over the ribbon is that it pulls the petal into the centre nicelyYou will end up with this curly mess that you see below. Tease it out and you will see the petals. Make sure that the thread is pulled as tightly as possibe without breaking the thread so that the gap in the center is as small as possible. The two inner edges of the flower should be brought together and stitched to hold them in place.

Turn the raw wdges to the back of the flower and stitch in place. Sew a button into the center to cover the unsightly bit.

How Annoying

I can't tell you how annoying Blogger can sometimes be. I tried and tried to post a picture of the card that I make on the video but it simply wouldn't let me so here it is on a separate post.


For details on how to draw the daisies and make the card please watch the video.

Sunday 8 May 2011

How to Draw daisies with calligraphy pens


I've made another video at last and I hope that it is as well received as the last one.

Saturday 7 May 2011

Folded ribbon rose tutorial

A couple of weeks ago I asked if your 'could guess what it is yet?' I thought that I could get on and make a tutorial straight away but I have been so busy that it has taken me until now to do a very straight forward tutorial. So I've decided that I will put you out of your misery straight away, by showing you that the tutorial will be for a folded ribbon rose. The title of the post rather gave it away though. As I told you before you will need the shocking pink 23mm wide grosgrain for this and I used the swiss dot one as I wanted to have the contrast between the plain side and the dotty side. You can make a plain one if you want to but this looks kind of cute.


You will need to start by rolling a short section of the ribbon and securing it with a couple of stitches. Stitching is better than gluing as it will held in place and then, if you want to put it on a garment you can wash it without being afraid that it will fall apart. This roll will be your bud.


Next fold the ribbon at a 90 degree angle to the roll as shown below.Roll the ribbon around the central bud until you get to the end of the folded part. It will be obvious when you do it. Secure the bottom with a couple of stitches. ,Fold and roll again and again. See below. Make sure to put in a couple of stitches as you go.Below is what your rose should look like after you have folded a few times.Now look at the back and you will see how this is coming along, and where to put the stitching. Basically you keep on going until you have as many petals as you want. The cut you r ribbon and tuck the raw wdge under and tack into place. Turn over and your ribbon is done.